Part 0: Structure
This document is in two parts. First it explains what every option of
the System Manager actually does. Then it gives recipes for doing
things you usually want to do. So, bear in mind, it’s not critical to
understand how everything works, especially the first time you use
DeityGuard, but the information is here if you need it. Feel free to
skip to the recipes section if you just want to get up and running.
Part 1: Explanation
Boot Process Overview
An overview of DeityGuard’s boot process will be helpful in
understanding the System Manager interface.
DeityGuard systems have a Linux kernel and an initramfs
containing the earlymount program on the BIOS chip. The
earlymount program is deliberately minimal: all it does is search
every attach block device for the Booster generated during the
DeityGuard build. The Booster is recognized by its SHA-256
checksum. earlymount tries to locate the Booster a certain number
of times and naps for a certain duration between tries (by default, 12
times and 5 seconds). After that, it gives up a naps forever after.
Once the Booster is loaded, it has dialog menu line option for
booting the OS. Since the OS image is verified at runtime, the
Booster contains the dm-verity checksums (128:1 reduction; each
8MB of verification data corresponds to about 1GB worth of OS
image).
Since the OS image is predetermined by the Booster, and the
Booster is predetermined by the earlymount configuration on the
BIOS image, updating the OS image requires also updating the
Booster image, which requires also updating the BIOS image. If
this sounds like a lot of work, don’t panic: one of the main goals of
the System Manager is to automate the upgrade process to a
reasonable degree!
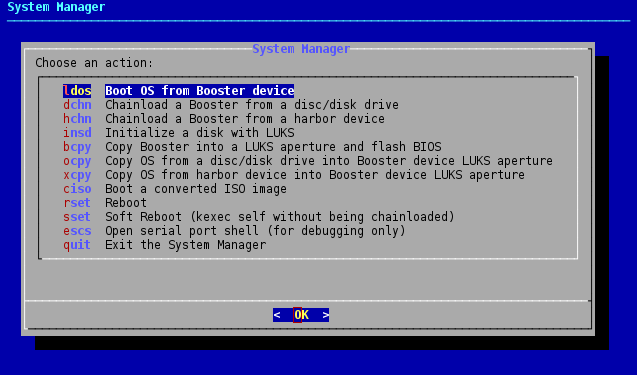
System Manager Overview
The main screen of the System Manager allows you to select an
action:
System Manager Terminology
The "Booster device" is the device on which earlymount located the
Booster.
A "LUKS aperture" is the space between a LUKS header and the
payload offset where the encrypted LUKS data starts. The LUKS
header format allows setting the payload offset to an arbitrary value,
and the “aperture” between the end of the LUKS header and the
beginning of the LUKS payload is unused by LUKS. When you format a
drive with LUKS in DeityGuard, you are asked how large an aperture
you want. The aperture is used by DeityGuard to store the Booster
and OS images. This allows your DeityGuard boot device to double
as your storage device while appearing as a normal full-disk LUKS
filesystem fully compatible with non-DeityGuard
systems. DeityGuard never does anything with the LUKS payload; in
fact you do not even need to unlock it to boot, though you do have to
supply a passphrase when creating it.
Action ldos: Boot OS from Booster device
This tries to boot an OS image from the Booster device. The OS
image must be an exact copy of the OS image at the time the
currently running Booster was built.
Action dchn: Chainload a Booster from a disc/disk drive
This presents you with a menu of currently attached drives. You can
choose one to chainload a Booster from. You will be presented with
the Booster checksum, and if you approve it, the new Booster’s
kernel and initramfs are kexec‘d, replacing the current instance
of Booster. Note that a chainloaded Booster has no associated
Booster device, so the actions that require a Booster device will
just error out. You can use the soft reboot feature to re-anchor a
chainloaded Booster to Booster device.
Action hchn: Chainload a Booster from a harbor device
(Not yet implemented)
Action insd: Initialize a disk with LUKS
This lets you initialize a disk with LUKS. You will be prompted for
choosing the disk to initialize and the aperture size you want. Note
that this will make any previous instance of LUKS on the same disk
completely and utterly unrecoverable (unless you have a “LUKS header
backup”).
Action bcpy: Copy Booster into a LUKS aperture and flash BIOS
The running Booster always has a copy of its own image stashed away
from when earlymount loaded it (or supplied by the chainloading
process if chainloaded). This writes the current Booster’s image
into a LUKS aperture and flashes the BIOS. Doing both of these
things from one menu action reduces the chances of bricking the
system, since you should be able at least to boot into the same
Booster (from where you should be able to chainload to get out of
any trouble, such as a missing OS image).
Sometimes you will get some error-looking thing from flashrom but
actually it succeeds in the end. bcpy checks the exit code of
flashrom and restores the old Booster if flashrom fails (of
course, this is not guaranteed to leave the system in a consistent
state if the BIOS was actually modified).
Action ocpy: Copy OS from a disc/disk drive into Booster device LUKS aperture
This copies an OS from a device other than the Booster device into
the Booster device’s LUKS aperture.
Action xcpy: Copy OS from a harbor device into Booster device LUKS aperture
(Not yet implemented)
Action ciso: Boot a converted ISO image
Searches attached devices for an ISO image tweaked with isogen and
runs it if found. All the data on the ISO is verified at runtime
with dm-verity (using root hashes contained in the System Manager).
Action rset: Reboot
This does a hard reboot. It just resets the machine, letting it run
whatever firmware is currently on the BIOS chip from the start.
Action sset: Soft Reboot (kexec self without being chainloaded)
This re-anchors a chainloaded Booster to the Booster device,
essentially making it not be chainloaded. As mentioned in the dchn
action, a chainloaded Booster is not associated with any Booster
device. Note that if there are multiple devices containing the same
Booster image, any of them could be selected, not necessarily the
one that the Booster was chainloaded from.
Action escs: Open serial port shell (for debugging only)
Self-explanatory.
Action quit: Exit the System Manager
This quits the System Manager and drops you to a shell instead. This should only be necessary if you really goofed things up somehow.
Part 2: Recipes
Here “sneaker medium” refers to a medium used to transfer data between
the build system and the target system. It can be a USB flash drive
or an optical disc.
Initial System Installation (when you have only a putboo image)
If you have only a putboo image on the sneaker medium to begin with,
follow these steps:
- attach the sneaker medium
- power up; you should get to the
System Manager - at this stage, you can already use the
cisofeature without further setup - run
insdto initialize a disk (other than the Booster device) withLUKS- skip this if you already have a
LUKSpartition with an aperture that you want to use - be super careful to select the right drive
- if you select something that is already
LUKSyou will probably lose the data on it
- if you select something that is already
- choose a big enough aperture for the future
- if you add a bunch of development tools you will easily get to a
6GBOSimage
- if you add a bunch of development tools you will easily get to a
- skip this if you already have a
- run
bcpyand select the same disk - remove the sneaker medium
- run
sset- you should get into theSystem Manageragain - return the sneaker medium to the build system and do:
./fingen.sh ./config/(whatever) putsqs
- attach the sneaker medium again
- run
ocpyand select the sneaker medium as the source - when the
ocpycompletes, remove the sneaker medium - now you can run
ldosto boot!
Initial System Installation (when you have a full putsqs image)
Same as above, except there is no need to return the sneaker medium
for putsqs, just skip directly to the ocpy step. Don’t forget to
detach the sneaker medium to make sure that the correct disk becomes
the Booster device during the sset cycle.
Upgrading
Chainload the new Booster twice with dchn and then follow the
steps for initial system installation, except don’t run
insd. Chainloading twice is a precaution against bricking; it makes
sure that the Booster is capable of chainloading before installing
it. The theory here is that as long as you can chainload, you are not
bricked, even if the other Booster functions don’t work properly.
Trying a new Booster / OS image without flashing
- power up; you should get to the
System Manager - attach the sneaker medium
- run
dchnto chainload theBoosteron the sneaker medium - run
ldosto boot